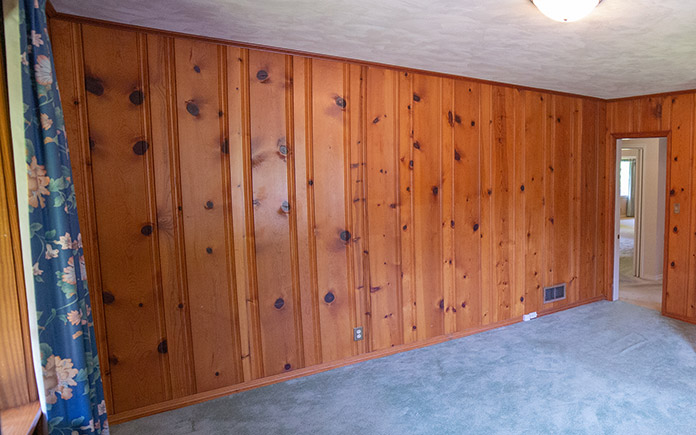
The height of wood paneling’s popularity was between the 1950s and 1970s; the trend has returned, but some folks want flat, timeless walls. If that’s you, here’s how to fill the grooves before painting paneling.
About Wood Paneling
If you’ve owned a home for a significant length of time, you know that design trends come and go. Floral wallpaper, glass block and shag carpeting are just a few options that once were wildly popular but have since fallen out of favor.
Wood paneling is in that same group. Homebuilders loved it because it was affordable, compared to alternatives, and easy to install. Homeowners loved it because it transformed plain drywall and complemented other trends of that era.
But these days, paneling is a polarizing topic. Some homeowners — especially those who weren’t around during its heyday — love it, and others, who lived through that trend and its overuse, would prefer to never see it again.
For that second group, there’s only one option if they’re renovating a home or purchasing an old one: painting the paneling.
Prepping Wood Paneling
A lot of people ask us, “Can you paint wood paneling?” And we’re happy to say, “Yes!”
But before you can paint over wood paneling, you need to prep it. For most people, that means filling in the grooves, which are the tell-tale signs that it’s wood paneling in the first place! The process is easy and doesn’t require any special skills.
Just follow these directions:
- Sand the paneling lightly to dull the gloss.
- Wipe any sanding dust off with a damp cloth.
- Fill in the paneling grooves with joint compound.
- Allow the joint compound to dry.
- Apply additional coats of joint compound, if needed.
- Sand the paneling with 100-grit sandpaper until the joint compound is smooth and flush with the paneling.
- Wipe any sanding dust off with a damp cloth.
- Prime the paneling with a shellac-based stain-blocking primer.
- Apply two coats of wall paint, using a 3/4-inch nap roller to add texture.
Watch this video to learn more!
Further Information
VIDEO TRANSCRIPT
Danny Lipford: Before you start painting paneling, you need to prep the surface. First of all, use a little drywall mud; this is the same joint compound that they use to finish drywall. And an old drywall guy showed me a pretty cool trick here.
If you want to speed up the drying process, then put regular joint compound there. Then you can use this, which we call fast mud or twenty-minute mud. Just mix a little in there.
The fast mud is a little hard to sand sometimes, but if you mix just a little bit in with it, it’ll speed it up. But you still can sand the surface smooth later on. Sometimes you have to add just a little bit of water to it. But this looks like it’s shaping up pretty good.
All right, after you mix it up well, then basically what you want to do is to fill the grooves in. You don’t want to put too much on the surface of the paneling, you just want to fill those grooves up so that it’ll dry. Sand it a little bit, then it’ll be time for the primer.
Boy, we were really lucky here in that the grooves in the paneling were not very deep, so one coat of joint compound, nice and smooth. But if you have deeper grooves in your paneling, you’ll need at least two coats to really surface it out well.
But then, after everything is nice and dry, time to grab the sanding pole again. Just really sand everything, really pay attention to all of the sanding; you can see how well it comes off.
And you really don’t have to sand all of the excess drywall off. You just want to get everything nice and smooth.
Then another wipe down with a damp rag before we prime.


