Hello there! After a long summer slumber, I’m back at it with a bunch of DIY’s! If you’ve read TDC for awhile, you know that I turn into a sloth in the summer. I try to fight it but it’s something that happens every year. I slow down and love it. 🙂
The second the temps start to cool down a bit I’m back at it with tons of ideas and projects! This DIY vent hood is an update I’ve been planning for a long time.
We had a metal vent hood that came standard with our kitchen. I considered a wood vent hood when we built, but I wanted to see how we liked this for awhile:

I had a vent hood added when I remodeled our last kitchen and loved it!:

That kitchen had more of a farmhouse feel and that design fit in perfectly!
Over time I was missing that added custom touch in our current kitchen. There’s no wrong or right here — the metal vent hood looked great! But I knew I could add some character with this project.
I had a design in mind that was a little more modern. I also had an idea that would allow me to build the whole thing without drilling into the tile backsplash. (In case we ever need/want to take it down.) These kinds of projects are so fun for me — it’s like putting a puzzle together as I go!
My plan called for removing all of the trim and crown on the sides of the cabinets:

I took those off and when I went to remove the crown I hit a hiccup I’ll tell you about in a minute.
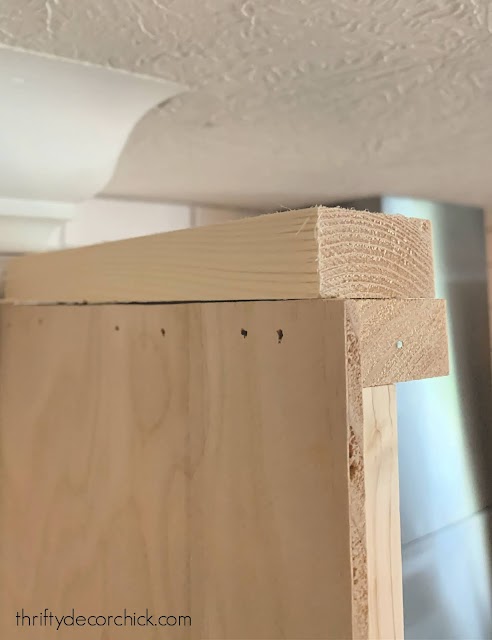
I cut down two matching pieces of wood that would become the sides of the vent hood. At the top I nailed in a 1×2 that I was going to use to secure these pieces into the ceiling:

As you can see, I left some space (the thickness of the boards I was using) at the front of each piece. More on that in a minute!
The crown came down fairly easily, and I started to work on the small trim underneath. It was then that I realized that the trim was installed before the cabinets — it looked like the molding and cabinets were installed from the top down. Waa waaaaa.
This threw my plan out the window, so I had to come up with a new way to do this:

I was determined not to drill into the tile or grout. If you don’t have tile or don’t mind drilling into it, you could use a 1×2 in the wall and attach everything to that.
You can see in that photo above that I ended up securing the board into the side of the cabinets, but down further than I originally planned (I had to cut the length a bit). Not a big deal, but I really wanted to have these secured into the ceiling as well.
This hood isn’t heavy — I used thin boards to build the whole thing. Cabinets are made to hold a great deal of weight, so even if this whole thing was attached to just the cabinets, it would have been fine. I just wanted it to be as secure as possible and I’ll share how I did that below!
This is where my nerd tendencies come out. 😜 I kind of like figuring out solutions when I hit an issue. Next I added more 1x2s to the bottom and the front — notice on the front I made sure to leave a gap (like I did at the top) for the front piece to fit in perfectly:

I did this so I didn’t have an unfinished edge showing on the sides of the hood. Normally that wouldn’t be a big deal because I’d cover them with trim, but because our cabinet doors are so close, that wasn’t an option. (The doors wouldn’t open if I added trim.)
It was helpful that I wanted this to have a slightly more modern design. It allowed me to build a box, which is way easier than what we had at the old house.
I was thinking ahead to continue the crown around the top (by coping the molding to match up against the current crown). So I added a bit of wood at the top that the crown could be nailed into:
That plan changed later, but that extra 1×2 was still helpful support.
I did this on both sides and then started the supports across the front:

You can see here how I created a way to make this extremely secure. I screwed a board into the ceiling beams above. The front was later attached to that, so this thing isn’t going anywhere. (I used a level to figure out the placement so the front panel would fit perfectly against it.)
If you are using thicker wood for your box, you may not need as many supports across the front. I was going as light as possible and only using quarter-inch thick luan for the front and that can get wobbly.
I attached the front piece, nailing it into the sides (the 1×2’s I showed you earlier), the supports across the front and the header piece:

This post may contain affiliate links for your convenience.
See my policies and disclosure page for more information.
I made sure that the side pieces came out enough that we could still reach inside to hit the buttons on the front of the vent. I used a vent with the buttons on the bottom at our old house.
I was left with an opening on the sides that I planned to add crown to:

But as I was finishing it all up, we realized we liked the simple design without the crown a lot.
So I ended up pulling this tool out:

It’s called a contour gauge and I used it our mud room to install shiplap around our window trim. You place it against whatever you’re trying to match and then trace the shape onto your wood. I used a jigsaw to cut the trim to match. I share the result below!
It’s never perfect, but I’ve told you a million times that caulk covers a multitude of sins. 😉
I used some scrap luan as a header across the top and then started adding my trim on the front with wide lattice pieces from Menard’s:

Then the finishing touches of filling holes, sanding those down and caulking:

I started painting it white to match the cabinets, but wasn’t quite feeling it. I color matched our cabinets last year when I added the cabinet “feet” and DIY light rails to our cabinets, but unless I sprayed the hood, I knew the finish wasn’t going to match perfectly.
I’m a lover of contrast, so I was being pulled to making the hood the same color as the island. I knew instantly it was the right move!
We absolutely love how it turned out!!:

It makes the kitchen feel more custom and adds the character I was hoping for:

Here’s a view of how the sides look after using the contour tool:

The funny thing is, it fits in so well, we barely noticed it almost immediately. It’s like it was always meant to be this way!

I shared this exact view a couple weeks ago when I showed you how I use trays for fall decor!:

Our hood vents to the outside and the intake vents are on the bottom. Make sure to look into those details if you attempt this project!

Here’s the color formula for this gray color:

I spent about $ 70 in wood to do this project — I used some scrap but had to buy most of it. Remember you can have your wood sheets cut down at the hardware store if you need help with that part.
I’m already excited about having the perfect spot for a Christmas wreath. 😉 
Have you added a vent hood in your kitchen? You can see how we did the more traditional vent hood design at our last house if that fits in better with your home.
If I missed anything you’re wondering about, or if you have any questions, please let me know!
You can shop the items in this post below:

JavaScript is currently disabled in this browser. Reactivate it to view this content.
Pin this image for later!:

See more of our home here. To shop items in our home, click here! Never miss a post by signing up to get posts via email.


