Hey there! I’m back with a fairly quick DIY that I’m working on throughout the house. I LOVE the character it adds to our home!
It didn’t take too long after we moved in for me to start changing out some of the door trim in the house. I did this chunky Craftsman trim on all of our doors in the old house and loved it. I didn’t have our builder do it here because I wasn’t sure where I wanted it.
We have WAY more doorways here — mostly just open ones that lead from one space to another. I felt like having it on every single doorway would be too much. But some are just calling out for it, like this tall opening to our foyer:
You have to go and
see the before to see the difference that simple trim made!
This post may contain affiliate links for your convenience.
On those larger doorways, I plan to replace all of the trim with thicker all around. But when working on the
little wallpapered hallway last year, I realized I could try leaving the side trim and just replace the top:
It turned out GREAT and I was hooked! Now my plan is to continue the widest doorways with all new trim all around, and then finish these smaller ones with the accent of the Craftsman header only.
On the smaller, more standard doorways, I don’t plan on changing out the trim at all. I think it will be a nice mix that adds just enough character around the house.
My next spot to tackle was this one between our kitchen and the mud room:
I took pictures of the actual process this time so I can show you the tool I use!
Adding the header is SO MUCH less work and time than replacing all of the trim, so it’s a good option for anyone who wants to add some detail and height to doors.
My old tool pooped out on me, so I picked up this one and it worked great!:
It charged fast and held the charge the whole time. As you can see, it was easier to use when I placed the saw attachment at an angle instead of straight on.
You’ll need to use a razor blade to cut through any caulk on the inside and outside of the door trim, then you can start pulling it away from the wall. A crowbar does the trick:
Take your time as you do this — you want to make sure you’ve cut all the way through the trim or it could start pulling more than you want away from the wall.
When I replace all of the trim I have to cut down the baseboards, recaulk all around and paint of course. This cuts that down big time because it’s concentrated to just the header.
Sometimes I’ll build my header first and then just place it on top of the trim. That’s what I did this time:
I’ll show you the exact trim pieces I used in a bit. First, here’s the final result after a few coats of paint:
You’ll need to caulk where the new and old meet to make it look like it started that way. I love how it looks together!
I find it easier to paint this before install, and then do one more coat after filling the nail holes (I use a nail gun to attach it to the wall).
Here’s a look at the before and after:
Here’s another view from this side:
And the view from the mud room:
Anyone see where I stopped painting this room? Haha! That’s next on my list.
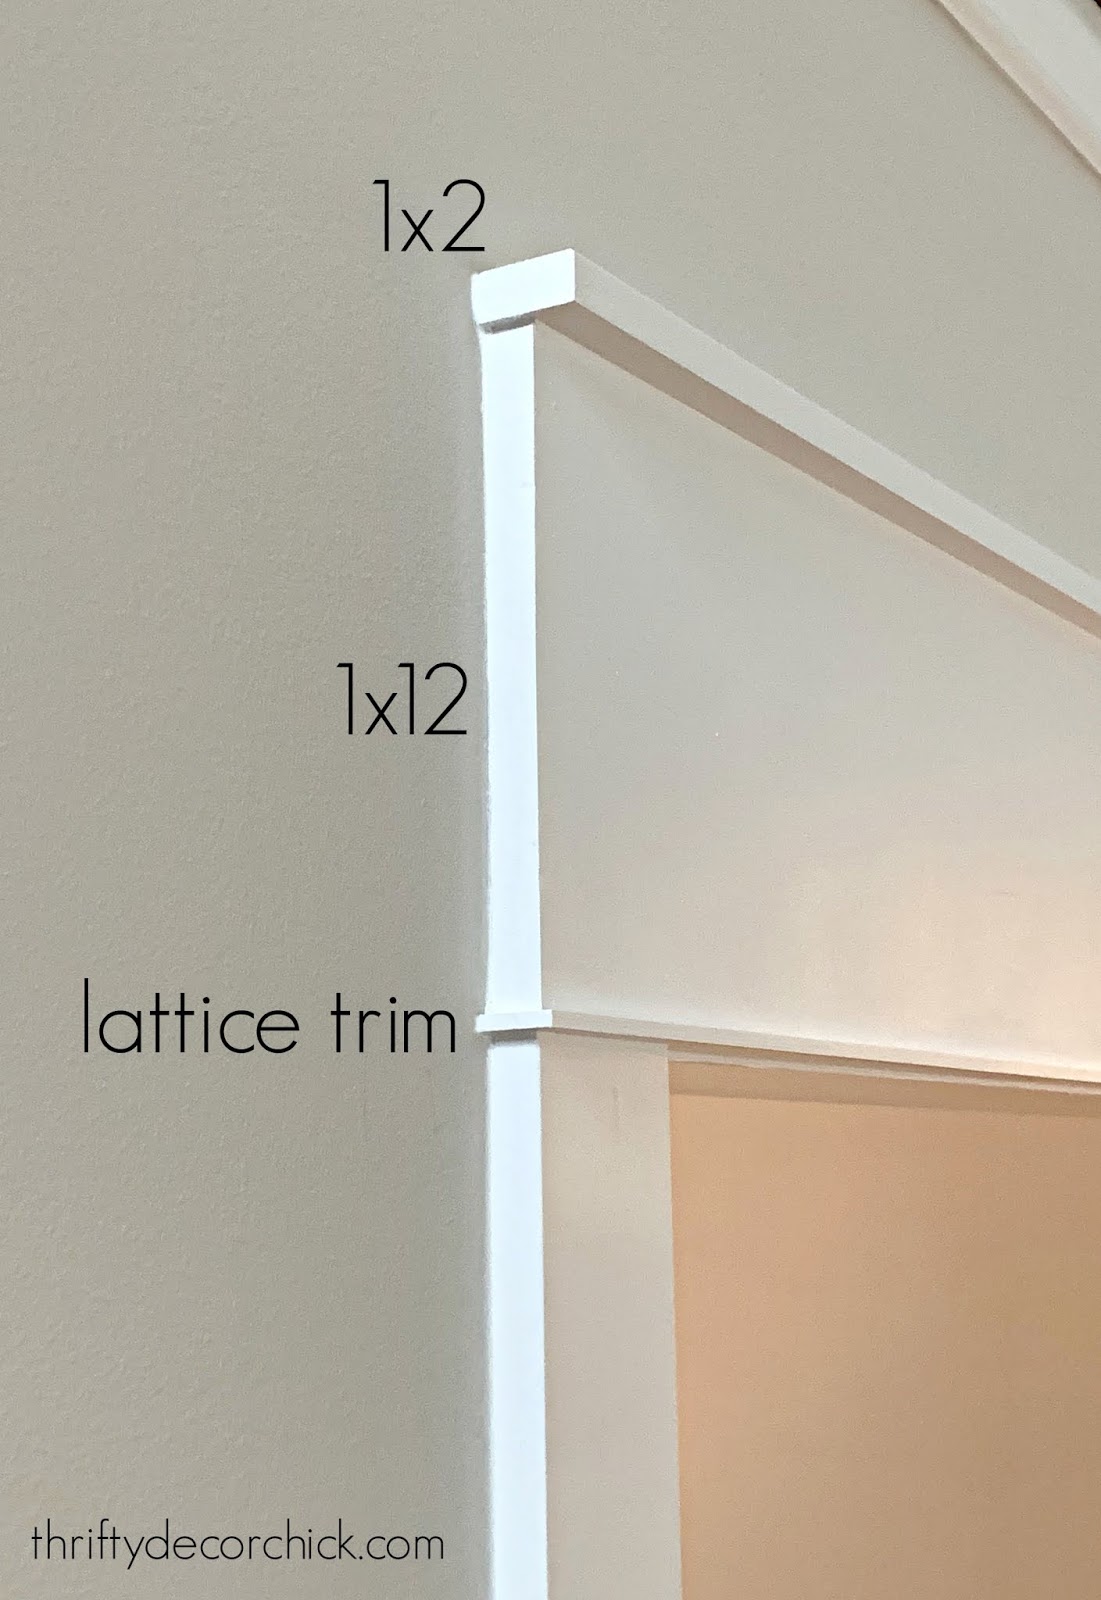
Here’s a visual on how to put these headers together — you can build before install or put it together on the wall. Either way works great! (I find it easier to paint if you build them first):
This is a side view of the one over our larger doorway. For the narrower spot in the kitchen I used a 1×6 since I didn’t have as much space above.
I hope this gives you better visual of how to put these together! They are very simple to build and make a bigger difference than you’d think for such a small project. I spent $ 20 to replace the header on both sides of the kitchen doorway (I had some lattice leftover so that saved me a few bucks).
See more of our home here. To shop items in our home, click here! Never miss a post by signing up to get posts via email.
Let’s block ads! (Why?)
Thrifty Decor Chick